There are a number of ways which you can access this functionality, which all require SharePoint Designer 2010. Depending on the method used to add a Custom Action to a list, certain options may or may not be available to customise what the Custom Action does when clicked, or where it appears in the Interface for the list.
For example, when you are viewing a list or library in your web browser, there is a “New Quick Step” button on the Ribbon in the “Customize List” group.
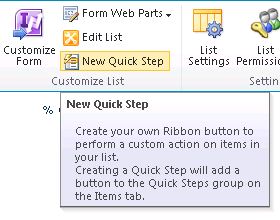
(Add a Quick Step to start a Workflow)
Using this option will add a Custom Action to the list, but limits the functionality to starting an existing or new Workflow associated with the list. Once the Custom Actions has been configured, it will be added to the Ribbon on the “Items” tab in a group called “Quick Steps” (Button Location = View Ribbon).

When viewing the list using SharePoint Designer 2010, there are two places that can be used to add Custom actions to the list. One is using the “Custom Action” drop-down option on the Ribbon, and the other is by pressing the “New...” button on the Custom Actions Section on the List Settings page.
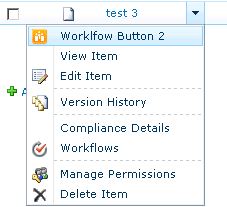
(Add a Custom Action to the List Item Menu)
When you use the “New...” button from the Custom Actions section on the settings page, this will add the Custom Action to the List Item Menu / LIM (The List Item Menu in SharePoint 2010 was known as the ECB menu (Edit Control Block) in earlier versions of SharePoint). Once the Custom Action has been created, it will be accessible from the drop-down menu of items in the list or library. When using this option to add a Custom Action, there are additional fields included to specify the “Rights Mask” and “Sequence Number” for the action.
Add a Custom Action from the settings page:

Using the “New...” button, the Custom Action is able to navigate to one of the Forms associated with the list, Start a new or existing Workflow or Navigate to a URL.
Custom Action Rights Mask (Display a Custom Action to users based on their Permissions):
The Rights Mask accepts one or more base (built-in) permissions for SharePoint which are used to control which users will see the Custom Action. For example, entering “EditListItems” into the Rights Mask field will result in the Custom Action being displayed to only users with access to edit items in the lust. A full list of the accepted values for the Rights Mask can be viewed here: SPBasePermissions.
Sequence Number Field for Custom Actions
The sequence number field is a little more self explanatory, where it accepts a whole number (integer) which is used to determine the order in which the action will be displayed on the List Item Menu.
Adding a Custom Action to New, Edit and Display Forms, the View Menu or List Item Menu
Using the “Custom Action” drop-down on the Ribbon when viewing the settings of a list in SharePoint Designer 2010 gives much greater control over where the action will be displayed on the interface for the list or list items, as well as the what the action itself can do.
Add Custom Action From the Ribbon
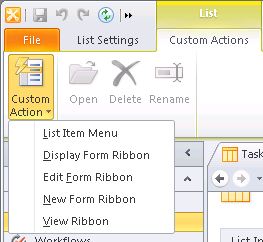
On the Custom Action Dropdown, there are additional areas listed for where the action will be displayed, which include adding to the LIM and View Ribbon, but are not limited to one of these similar the previous methods explained:
- List Item Menu - Adds a Custom Action to the item menu similar to using the “New...” button.
- Display Form Ribbon - Adds the custom action to the Ribbon for the display form when viewing the properties of a list item or document.
- Edit Form Ribbon - Adds the Custom Action to the Ribbon when editing the properties of a list item or document
- New Form Ribbon - Adds the Custom Action to the Ribbon when adding a new item to the list.
- View Ribbon - Adds the Custom Action to the Ribbon when viewing the list if items in the List or Library, similar to using the “Add a Quick Step” option explained earlier.
When adding a Custom Action to a list or library using this drop-down menu on the SharePoint Designer Ribbon, the functions available for the action is the same as using the “New...’ button (navigate to one of the Forms associated with the list, Start a new or existing Workflow or Navigate to a URL). Using this method to create a Custom Action, there is also an additional field called “Ribbon Location (Tab.Group ID)” available, which is used to specify where in the Interface the button or link will appear. The value in this field is set automatically based on selection of the where the action is to be added. The “Rights Mask” and “Sequence Number” fields explained earlier are also included when using this method.

Related:
Add Custom Links to the Interface as a Site Feature with or without using Visual Studio - This post explains how to add custom actions to the interface in SharePoint 2010 using a Feature added to a project in Visual Studio 2010, or by manually creating the feature xml file using a text editor and enabling using PowerShell or STSADM.
Restrict Custom Links in the User Interface based on Permissions - This post explains how to apply restrictions to Custom Actions based on user permissions. The custom links are the displayed only to users with the specified permission level on the site, list or item.
Add User Control to Master Page Using SharePoint Designer 2010 - This article explains how to add a custom User Control to pages in SharePoint 2010 such as a Master Page or, Page Layout or Application page.
SharePoint Master Page: Include Title of a Site as a link to the Site’s Homepage - This article explains how to add a link to a Master Page or page in SharePoint 2010 that points to the Homepage of the current site with the title of the site as the link/anchor text. This can be done using SharePoint Designer or Visual Studio when editing the source of the page.


No comments:
Post a Comment